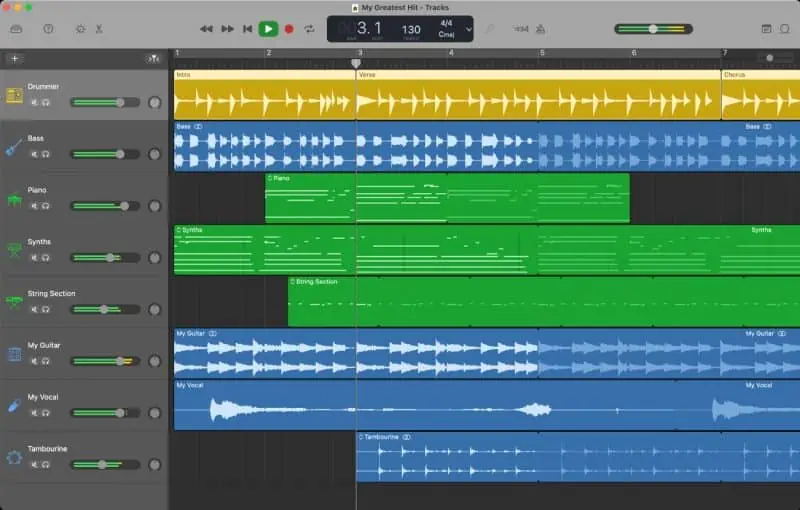
GarageBand, the well-known digital audio workstation crafted by the technology giant Apple Inc., has earned a stellar reputation among musicians and podcasters alike for its versatility and ease of use. Regrettably, this powerful tool has been exclusively developed for Mac and iOS platforms, leaving Windows users searching for alternatives. But fear not, for this comprehensive guide is here to shed light on the process of downloading, installing, and effectively utilizing GarageBand on the Windows 11 operating system.
As you embark on this journey of creative exploration, we will dive into getting GarageBand for Windows 11, ensuring a seamless installation process and providing expert tips on harnessing the full potential of this exceptional audio workstation. Prepare to level up your music production and podcasting capabilities with the power of GarageBand on Windows.
Download and install GarageBand for Windows
While GarageBand doesn’t have a version natively built for Windows, we will use a Virtual Machine (VM) to install MacOS on your Windows PC by using VMWare.
Download Mac OS Monterey VM
Begin by acquiring the Mac OS Monterey Virtual Image and the VMware Player Patch Tool, both essential components for this process. Once downloaded, extract the contents from their zip folders, revealing the necessary files for the next steps.
Navigate to the Unlocker folder and locate the win-install script. To execute this script, right-click on it and select the “Run as Administrator” option. This action will trigger the automatic execution of the patch script within the Command Prompt, streamlining the process for your convenience.

Upon completion of the steps above, it is time to launch VMware. With the groundwork in place, you are now prepared to continue with the remaining stages of the process, bringing you closer to experiencing GarageBand on your Windows 11 device.
Create a new Virtual Machine with Mac OS
Proceed by selecting the “Create a New Virtual Machine” option within VMware, followed by choosing “I will install the operating system later.” Click “Next” to continue advancing through the setup process.
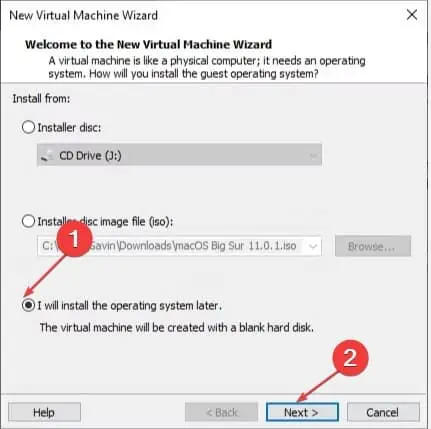
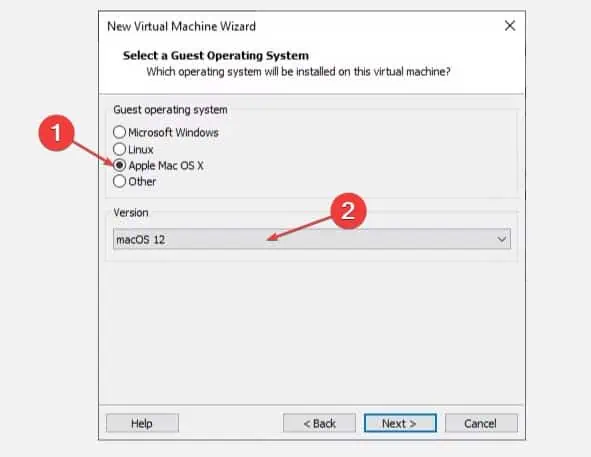
In the subsequent window, opt for “Apple macOS X” as the operating system, and specifically select “macOS 12” from the available choices. Once done, click “Next” to move forward.
As you progress, you will be prompted to assign a straightforward name for the macOS Monterey virtual machine (VM). After inputting the desired name, copy the file path to your Desktop folder for easy access later.
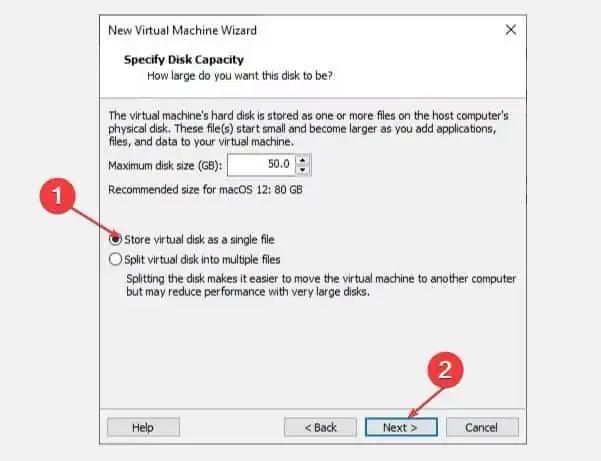
In the following window, you will be tasked with setting the disk size for your virtual machine. Allocate a minimum of 50GB to accommodate the necessary files and resources. Select the “Store virtual disk as a single file” option to maintain an organized file structure. Once these preferences have been set, click “Next” to continue the installation process.
Tweak the Mac OS VM settings
On the VMware screen, locate the macOS Monterey virtual machine (VM) you have created. Right-click on it and choose “Settings” from the context menu to access the VM’s configuration options.
To optimize performance, allocate a minimum of 4GB of memory (RAM) to the VM. Additionally, under the “Processors” section, ensure that you designate at least 2 cores for the virtual machine. (you can allocate more, depending on our CPU and configuration).
Next, navigate to the “New CD/DVD (SATA)” section and opt for the “Use ISO image file” option. Upon selecting this, you will be prompted to choose the macOS Monterey ISO file you previously downloaded. Make sure to provide the correct file to facilitate the installation process.
Once these configurations have been completed, close the “Hardware” window, and click “Finish.” You are now one step closer to experiencing GarageBand on your Windows 11 device.
Edit the VMX file for Intel or AMD
To proceed with the next stage, open the File Explorer on your Windows 11 device and navigate to the default location where you saved the macOS Monterey virtual machine (VM) files earlier.
Locate the “macOS Monterey.vmx” file, right-click on it, and from the context menu, choose “Open with.” In the list of available applications, select “Notepad” to open the file in a text editor.
C:\Users\YOURNAME\Documents\Virtual Machines\YOUR MAC OS X FOLDER
With the configuration file now open in Notepad, proceed to add the following lines to the bottom of the file:
Intel
smbios.reflectHost = "TRUE" hw.model = "MacBookPro14,3" board-id = "Mac-551B86E5744E2388" smc.version = "0"
AMD
cpuid.0.eax = “0000:0000:0000:0000:0000:0000:0000:1011” cpuid.0.ebx = “0111:0101:0110:1110:0110:0101:0100:0111” cpuid.0.ecx = “0110:1100:0110:0101:0111:0100:0110:1110” cpuid.0.edx = “0100:1001:0110:0101:0110:1110:0110:1001” cpuid.1.eax = “0000:0000:0000:0001:0000:0110:0111:0001” cpuid.1.ebx = “0000:0010:0000:0001:0000:1000:0000:0000” cpuid.1.ecx = “1000:0010:1001:1000:0010:0010:0000:0011” cpuid.1.edx = “0000:0111:1000:1011:1111:1011:1111:1111”
By appending these lines to the configuration file, you will ensure the proper functioning of the virtual machine and be one step closer to using GarageBand on your Windows 11 device.
Install the macOS Monterey VM
Within the virtual machine, proceed by selecting the “Disk Utility” application, which plays a crucial role in managing storage devices and file systems on macOS. Once Disk Utility is open, look for the “VMware Virtual SATA hard drive Media” in the “Internal” drive column on the left side of the application window.
Selecting the “VMware Virtual SATA hard drive Media” will allow you to configure and manage the virtual hard drive for your macOS Monterey installation on the Windows 11 device.
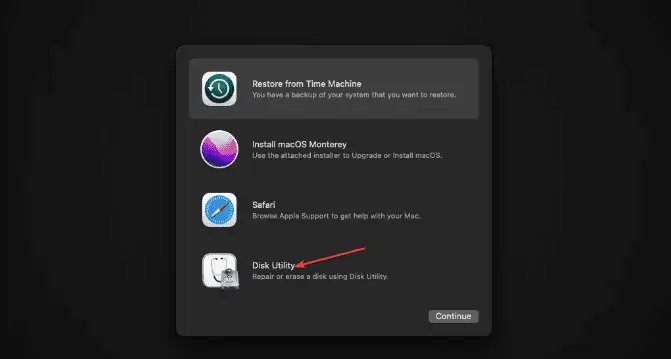
With the “VMware Virtual SATA hard drive Media” selected in Disk Utility, locate and click on the “Erase” option at the top of the window. This action will initiate formatting the virtual hard drive and preparing it for the macOS Monterey installation.
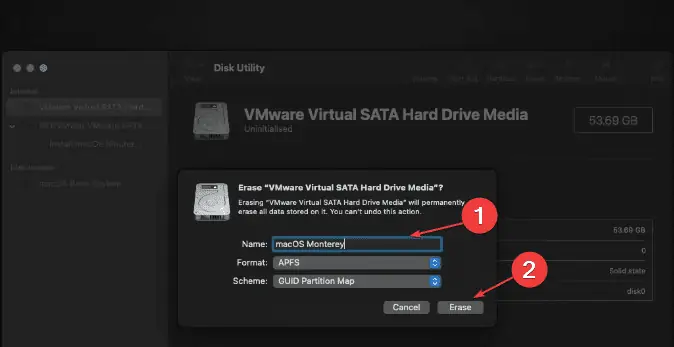
When prompted, assign a name to the virtual drive. For the “Format” option, choose “APFS” (Apple File System), which is the recommended file system for macOS installations. Additionally, set the “Scheme” to “GUID Partition Map” ensuring compatibility and optimal performance.
Once these settings have been configured, click the “Erase” button to format the virtual hard drive accordingly.
After successfully formatting the virtual hard drive using Disk Utility, navigate back to the macOS Monterey recovery screen. Here, you will find the option to “Install macOS Monterey.” Select it to commence the installation process.
You will be prompted to choose a target drive for the installation. Select the virtual drive that you previously created and formatted in Disk Utility. With the appropriate drive selected, click on the “Continue” button to install macOS Monterey.
Last step – Install VMware tools by selecting Player, Manage, and then Install VMware Tools.
Download and install GarageBand
Once the macOS Monterey installation is complete, navigate to the official download page for GarageBand by visiting the following URL: GarageBand’s official download page
Upon arriving at the page, click on the “Download” button. This action will redirect you to the App Store, where you can access GarageBand.
Inside the App Store, locate the “Get” or “Download” button and click on it. If prompted to “Install app,” proceed by selecting this option to initiate the download process.

You will be asked to provide your Apple ID and password. Enter your credentials and click “Sign in” to authenticate your account and authorize the download.
Once the GarageBand download is complete, you will find the app in various locations on your virtual macOS Monterey environment, such as the Launchpad, Applications folder, or within Finder. With GarageBand now installed on your Windows 11 device, you can explore its creative possibilities and enjoy your new piece of software.

