
Webcams have become a must-have in today’s digital society. They are used to be a part of online meetings or to have a video chat with anyone, which includes live audio and video.
They also allow you to record or live stream videos to the internet, they can be also applied to different uses such as video security, commerce, online dating, newscasting, and even laser beam profiling.
As impressive as all of these sounds, the majority of desktop computers and some categories of laptops just don’t come with this necessary piece of hardware.
Therefore you would either need to invest some money in getting a webcam, which might burn a hole in your pocket or use your phone as a webcam, which is by far a cheaper option. The same camera that is used to take selfies can be used as a productivity tool.
Nevertheless, the knowledge of how to use your phone as a webcam is not all that common. That’s why in this article you are going to be guided on how to do it. We will start with how to use your android device as a webcam then move on to being able to do the same with your iPhone or iPad.
Using Your Phone as a Webcam on a Windows or Linux PC
Before you proceed to the following steps, you would want to make sure that your phone and PC are operating on the same Wifi connection. If this is not possible you can connect them using a USB cable.
Please note that if you are using your phone as a webcam for a long period, it is recommended that you keep it plugged into a source of power, as streaming video with your phone will use up its battery in a short while.
It is also recommended you pick a tripod so that you don’t have to prop up your phone on anything precarious. Ready to learn how to convert your phone to a webcam? Here’s what you need to do.
- Download the Droidcam Wireless Webcam application on your android phone.
It requires that your android phone should be running on an Android 5.0 Lollipop or newer software.
- You would also need to download the desktop client on your Windows or Linux PC
- After installing the droid cam app on your phone, you’ll also need to get it up and running on your PC. As this installation goes on, you might need to allow the app to install some audio drivers.
Once the desktop client is running, you should see options near the top of the app window that will let you decide whether to connect your PC and device wirelessly or through USB. It is set on the Wifi connection setting by default and you would need to change it to the USB setting if you prefer.
- When you launch the app on your PC, you would also see it prompting you to input your device IP address.
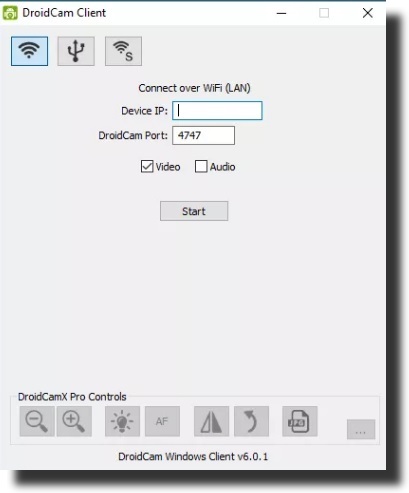
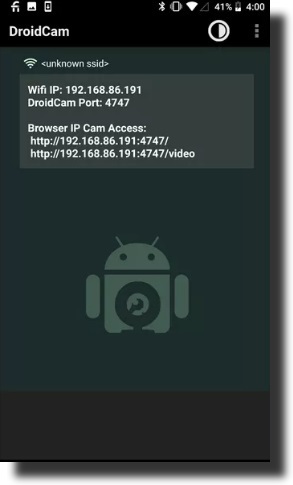
When you launch the app on your smartphone, skip everything till you get to a page where you’ll see the Device IP. Input that address into the part labeled Device IP.
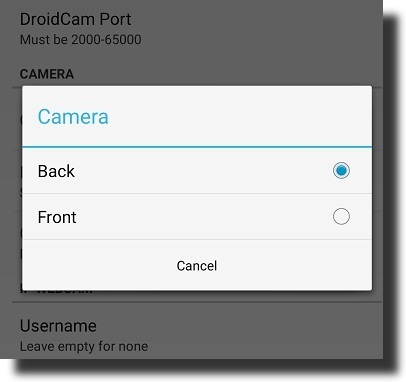
To choose between the front and rear camera on your android; click on the three-dot icon, then Settings followed with the camera. It is recommended that you use the rear camera as this usually gives a better video quality. Most of the other default settings are set to the optimum setting, so you can leave them as they were.
- Before you hit start on the desktop app be sure that both boxes for video and audio options are checked. If any is left unchecked your phone will not pick up any video or audio respectively.
- You can now hit ‘Start’ on the desktop app to begin the connection. You would then see a preview of the video feed on your PC screen. If you can’t find it, please ensure that both your android device and PC are on the same Wifi network or LAN.
If everything is running smoothly, then all you need do next is launch the video conferencing app, that you would normally use and select Droidcam as your camera and if you so wish, select Droidcam Virtual Audio as your audio input, this will make your device microphone your default audio input.
Please note while the Droidcam app is available for iOS devices, it is not available for macOS. As such, you can use your iOS device as your webcam on your Windows or Linux PC.
Now let’s get to using your smartphone as a webcam on MacOS.
Using Your Smartphone as a Webcam on a macOS
To do this, you would need to download the EpocCam software from their site or also from the app store. It requires an iOS 10.3 or newer software. Unlike Droidcam, it is available for both Windows and macOS.
The best thing about this software is that you do not need to go through additional things as you did with the Droidcam, once you are connected on the same Wifi network or LAN, you then launch the EpocCam app on your smartphone and then your desktop.
Once you are getting the video output from the app on your desktop, you can then select EpocCamera as your camera in your videoconferencing app. Once you have selected it, you should get a notification on your computer confirming that the camera is connected via Wifi.
The only con to the EpocCam app is that the free version comes along with a lot of restrictions like your video resolution being restricted to just 640 x 480 and also not being able to use your smartphone’s microphone.
If things are not working perfectly, here are some steps to consider.
- If you are using a browser-based videoconferencing app, you might need to give your browser permission to access the webcam. Look for a notification close to the web address bar for this or check your browser settings.
- If you are using the Zoom application, you might need a slightly older version(4.6.7) for it to recognize your device as a suitable webcam. The latest update (4.6.11) as at the time of writing this wasn’t fully compatible with the EpocCam app.
These are the methods of using your smartphone as a Webcam on your Windows, Linux, or macOS PCs.


")


